Beef Wellington
This post may contain affiliate links.
One of the most impressive dishes you’ll ever make is a Beef Wellington. This traditional recipe is made with a flavorful beef tenderloin, coated with mushroom duxelles, wrapped in prosciutto and a puff pastry crust. The layers of flavor are incredible and the presentation is stunning!
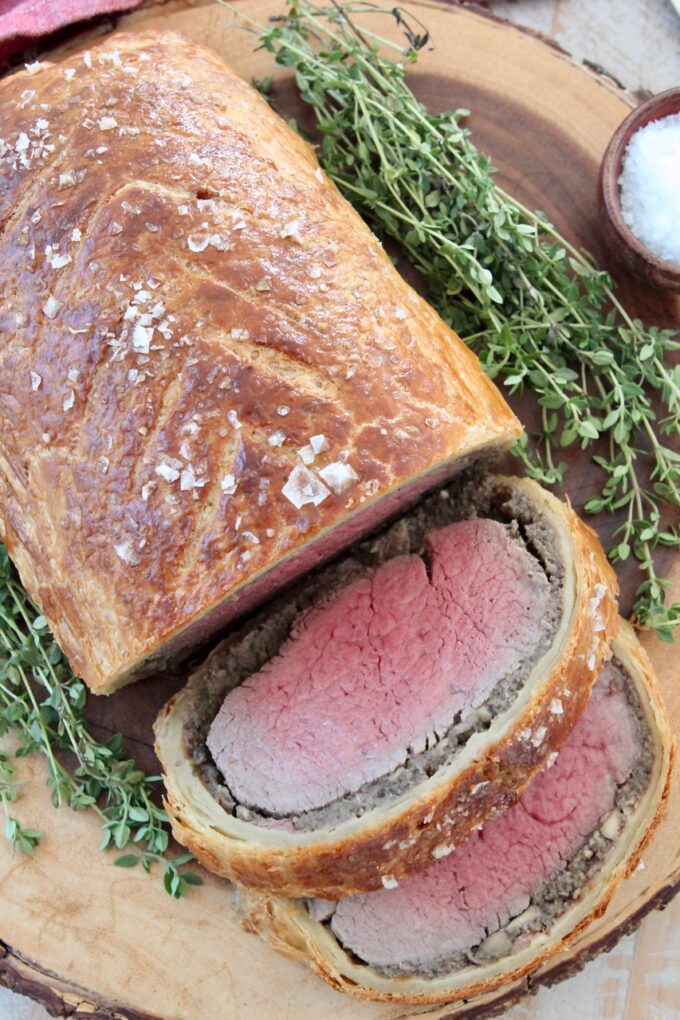
Thank you to my friends at California Beef Council for sponsoring today’s post!
Beef Wellington is a wow-the-crowd kind of recipe. It’s a spectacular centerpiece for a holiday meal and it’s actually not as hard to make as you might think! While yes, beef wellington is one of the lengthier recipes on the blog, a lot of the time it takes to make the recipe is spent waiting for the different components to chill in the refrigerator. The perfect time to sip on a glass of wine, if you ask me!
In this post I’m going to teach you how to make beef wellington at home, so that it’s perfect from the first time you make it! This recipe is an investment in both time and ingredients, so I want to make sure I give you every key to success. That being said, if you scroll to the bottom of this post, you’ll see a 17 minute video (yes 17 whole minutes!) where I walk you step-by-step through the recipe.
If you’re going to take the dive into making this impressive beef wellington recipe, this video will walk you through every step, so you never have questions about if you’re doing things right along the way. If you’d rather learn by reading instead of watching, this post will walk you through every step in detail, with pictures of each step along the way. After this post, I promise, you’re going to be well-prepared to make your first beef wellington!
Beef Wellington might just be the most luxurious recipe you’ll ever make. It’s bursting with savory, salty, unami flavors and in the center of it all is a prized piece of the most tender cut of meat, the beef tenderloin. Flakey, buttery puff pastry, wrapped around incredibly tender, juicy meat, coated with a flavorful mushroom mixture and salty prosciutto. I mean, seriously, it’s mouth-watering good and down-right impressive!
Table of contents
Ingredients
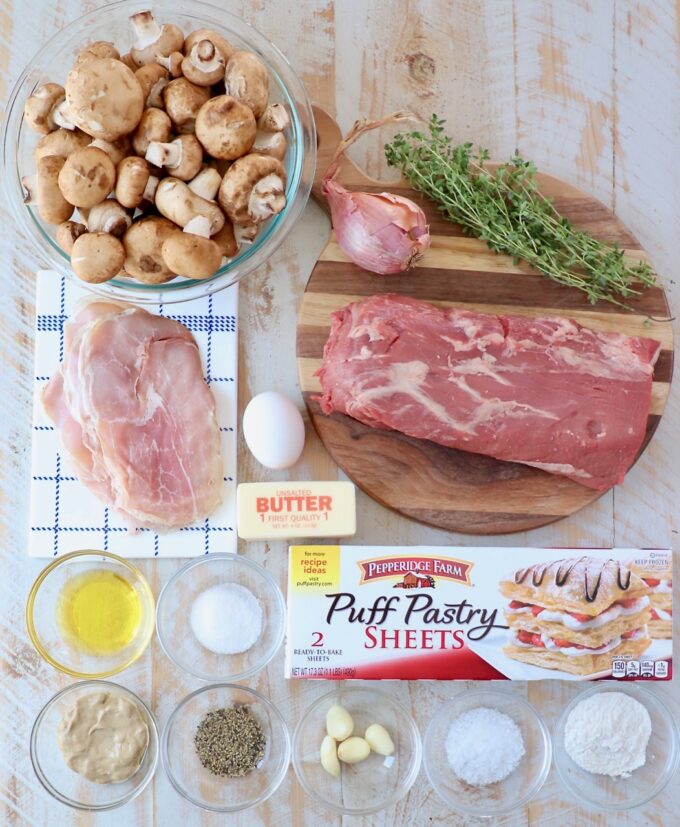
A beef wellington is made up of 5 main components, a beef tenderloin, dijon mustard, duxelles (a French mushroom paste – more on that below), prosciutto and puff pastry. While you could make your own puff pastry at home, this is already a complex recipe, so I recommend purchasing frozen puff pastry dough at the grocery store.
When picking out a beef tenderloin for this recipe, look for one that’s around 2 pounds and already trimmed. I do not recommend making substitutions for the ingredients in this recipe, as they each serve their own purpose in the dish, and making changes could alter the final result of the recipe.
- Center-cut beef tenderloin – for this recipe you’ll want a 2-3 pound beef tenderloin. I do not recommend a larger cut of meat, as it will be hard to cook the meat at the same time and temperature as the puff pastry. You’ll want to use a center-cut beef tenderloin, if possible. That means it’s cut from the center and generally the same diameter on each end of the meat. If you use an end-cut, one side of the beef tenderloin will be much skinnier than the other side.
- Kosher salt
- Ground black pepper
- Olive oil
- Dijon mustard
- Baby bella mushrooms – I prefer baby bella (also called crimini mushrooms) over white mushrooms for this recipe, as they have a earthier, meatier flavor than white mushrooms, which makes them perfect for pairing with beef.
- Shallots – this variety of onion has a sweet, delicate flavor with a hint of sharpness. You can substitute onions in this recipe, just know that they’ll have a more sharp, pungent, less sweet flavor than the shallots.
- Garlic cloves
- Fresh thyme sprigs
- Unsalted butter
- Prosciutto – sliced prosciutto can be found in the deli section of most major grocery stores. You want it thinly sliced, but not paper thin, as it needs to be able to wrap around the tenderloin without ripping. Prosciutto di parma, or parma ham, is the most famous prosciutto from Italy that’s cured for at least 8 months, or up to 2 years. If you can find it, I recommend using it for this recipe. If you’re going big with a beef wellington, might as well go big with all of the ingredients inside!
- All-purpose flour
- Puff pastry dough – you’ll find a box of this dough in the freezer section at the grocery store. Make sure to purchase a package that contains 2 sheets of puff pastry dough. Since the dough is frozen, you’ll want to remove it from the freezer to let it thaw at room temperature for at least 30 minutes. While you could make your own puff pastry dough, you’re already dedicating a lot of time in the kitchen to make the beef wellington, so I recommend using the store-bought puff pastry dough. It works just as well as homemade!
- Egg
- Sea salt flakes – also referred to as finishing salt or flaky sea salt, this salt can be found at most grocery stores near the other salts, or you can purchase it online. Using flakes of sea salt on top of the beef wellington gives it a beautiful finish.
For the ingredient amounts, detailed step by step instructions and a 17 minute in-depth video on how to make beef wellington, scroll to the recipe card in the bottom of the post.
Step by step instructions
Prepare the beef tenderloin
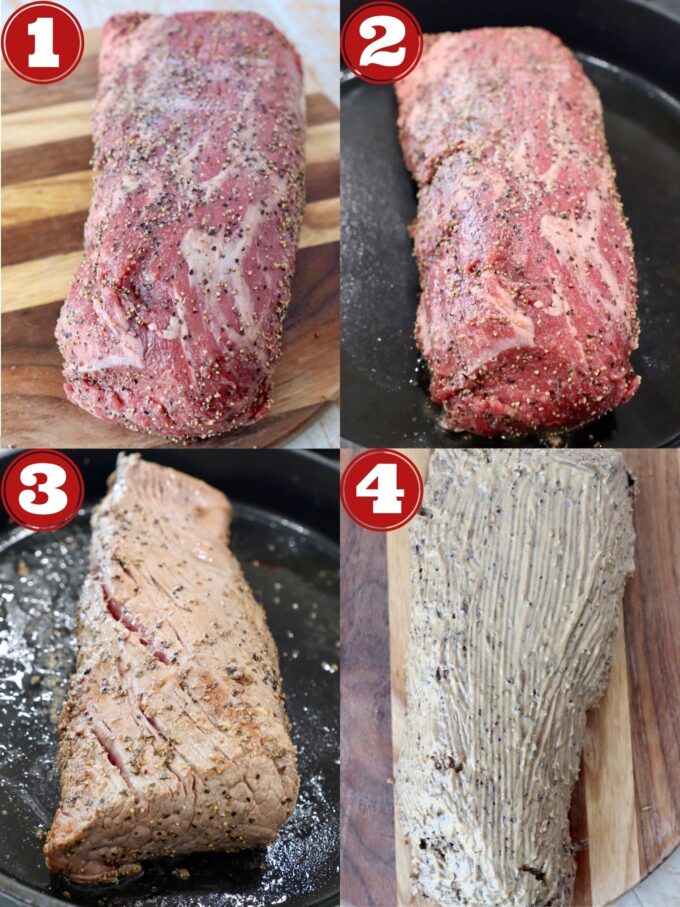
- Season the beef tenderloin with salt and pepper.
- Coat the bottom of a cast iron, or heavy skillet, in olive oil. Turn the heat on the stove to high. Once the pan is very hot, add the seasoned tenderloin to the skillet.
- Sear the tenderloin until browned on all sides, including the ends. This should take about 2 minutes per side, approximately 12 minutes total.
- Remove the tenderloin from the skillet and place on a cutting board. Let cool for 5-10 minutes, then use a pastry brush to brush dijon mustard on all sides of the tenderloin, including the ends. Place the mustard-coated tenderloin in the refrigerator to cool.
Prepare the duxelles
Duxelles (pronounced dook-sel) is a French cooking term for a combination of finely-chopped mushrooms, shallots, garlic and herbs, cooked down in butter until it’s reduced to a paste. Duxelle is most commonly used as a stuffing or sauce, and can also be used to fill pastry dough, to make a savory tart.
It’s actually quite easy to make in just 4 simple steps, but it does take some time to cook down into a paste. This is one of the most important steps when making beef wellington. If you do not let all of the liquid cook out of the duxelles, you will end up with soggy puff pastry dough, which no one wants! To avoid this, follow the instructions below and allow the duxelles to cook down for at least 25-30 minutes.
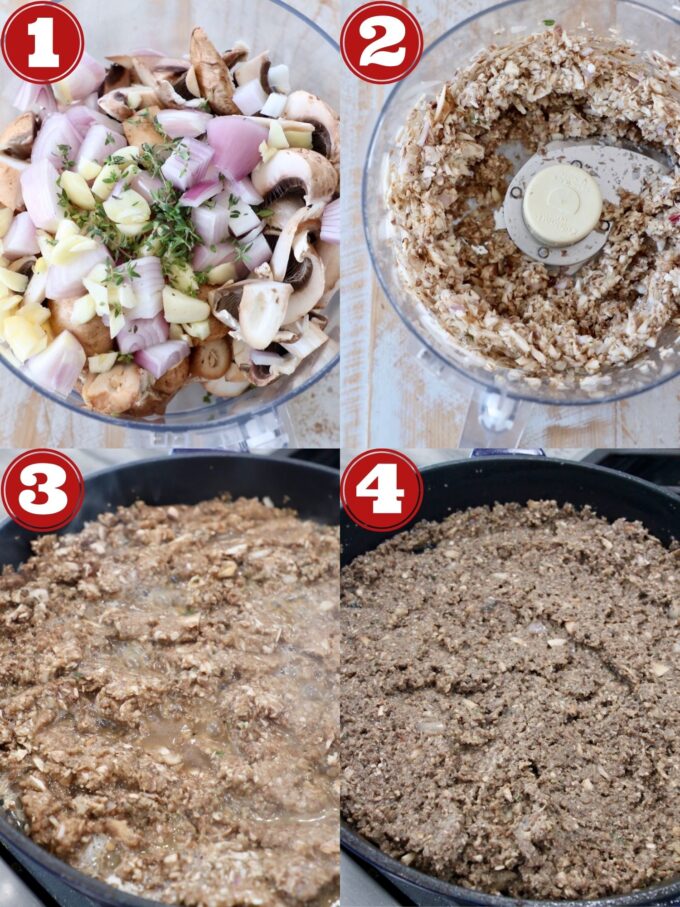
- Add roughly chopped mushrooms, shallots, garlic and fresh thyme leaves to a food processor. Depending on how large your food processor is, you might have to do this in 2-3 batches.
- Pulse the vegetables and herbs in the food processor until they’re very finely chopped, but before it becomes a paste.
- Add butter to a large skillet on the stove over medium high heat. Once the butter has melted, add the duxelles mixture from the food processor. Season with salt. This will help pull the liquid from the vegetables. You can see in the picture above, all of the liquid pooling at the top of the mixture. This is what we’re cooking off during this process.
- Let the mixture simmer on the stove for at least 25-30 minutes, or until the liquid has cooked off and you’re left with a paste, as pictured above. The mixture should be stirred only occasionally during the 25-30 minutes. Once the duxelles has turned into a paste, remove it from the stove and transfer it from the skillet into a bowl. Place the bowl of duxelles in the refrigerator to cool for at least 30 minutes.
- Note: While you can cool the duxelles in the skillet that it was made in, since the skillet is hot, it will take much longer for the duxelles to chill. This is why I recommend transferring the mixture to a bowl for chilling.
Wrap the tenderloin in prosciutto
Once the duxelles mixture is chilled to room temperature, or below, it’s time for the first step in assembling the beef wellington.
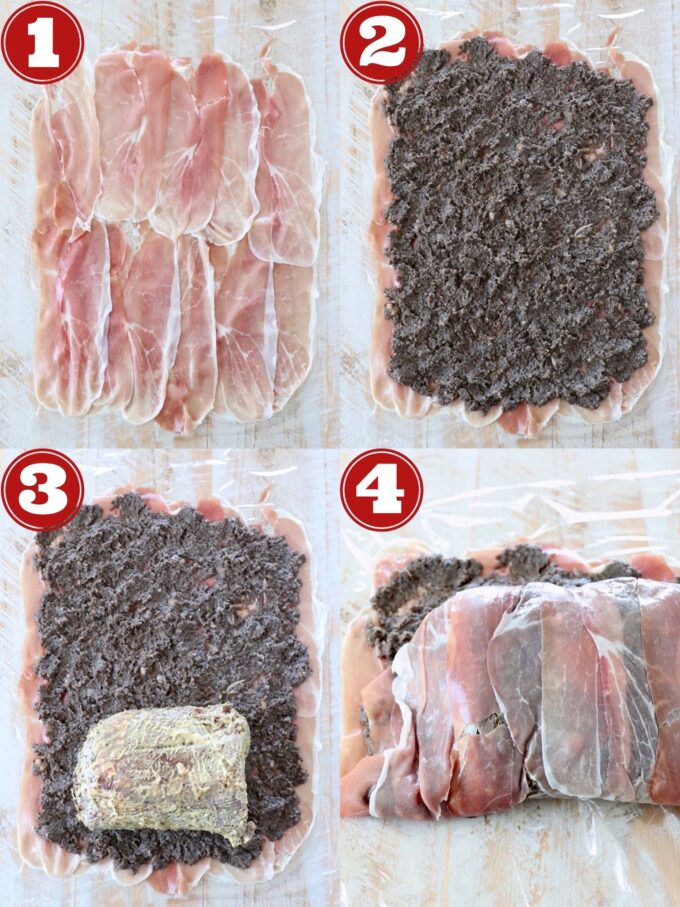
- Place two pieces of plastic wrap down on a work surface, overlapping so that it’s twice the length and width of the tenderloin. Lay the slices of prosciutto in two rows, slightly overlapping, in the middle of the plastic wrap.
- Spread the duxelles in an even layer over the prosciutto, leaving about a 1 inch edge around the prosciutto. This will allow the duxelles mixture to spread slightly, as it’s wrapped up, without spilling out of the wellington.
- Place the tenderloin at the bottom of the duxelles topped prosciutto.
- Roll the meat up in the duxelles and prosciutto, using the plastic wrap to help you tightly wrap it up along the way. Tuck in the ends of prosciutto as you roll it up. Once the tenderloin is fully wrapped in the prosciutto, wrap the entire thing up in the plastic wrap and place in the refrigerator for 10 minutes. This will help it maintain it’s shape.
Wrap the tenderloin in puff pastry
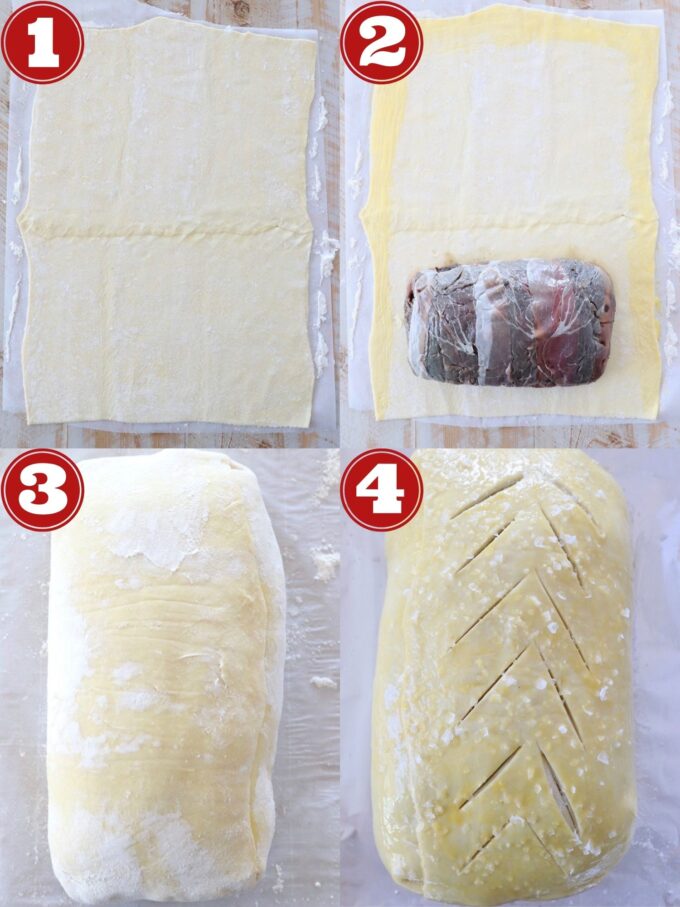
- Preheat the oven to 425°F. Lightly flour your work surface, then unroll the puff pastry dough onto the surface. If working with two sheets of dough, overlap them slightly in the middle. Use a rolling pin to roll the dough into a rectangle, that’s about 4 inches wider than the beef tenderloin.
- Remove the prosciutto wrapped tenderloin from the plastic wrap and place it about 2 inches from the bottom of the puff pastry dough, right in the middle, with about 2 inches on both sides. Whisk an egg in a small bowl, then brush the whisked egg on the top and down the sides of the puff pastry. Place the remaining whisked egg in the refrigerator, as you’ll use that on top of the beef wellington, as well.
- Tightly roll the puff pastry dough over the tenderloin. Tuck the sides of the puff pastry down and use a fork to help seal the sides of the dough. Wrap the beef wellington up tightly with plastic wrap and place in the refrigerator for 30 minutes to chill.
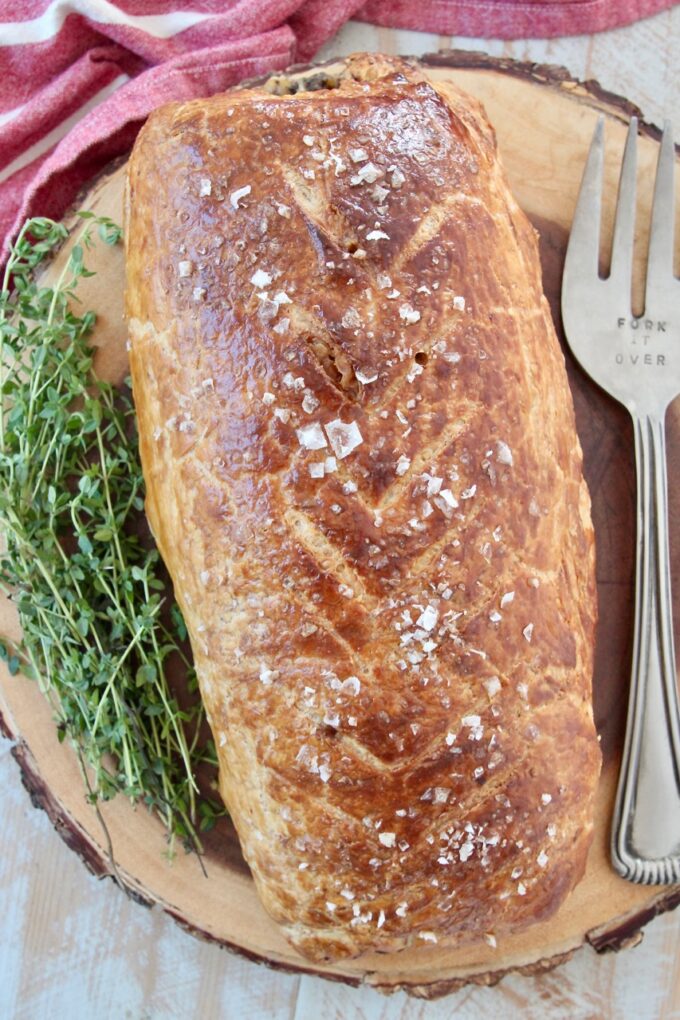
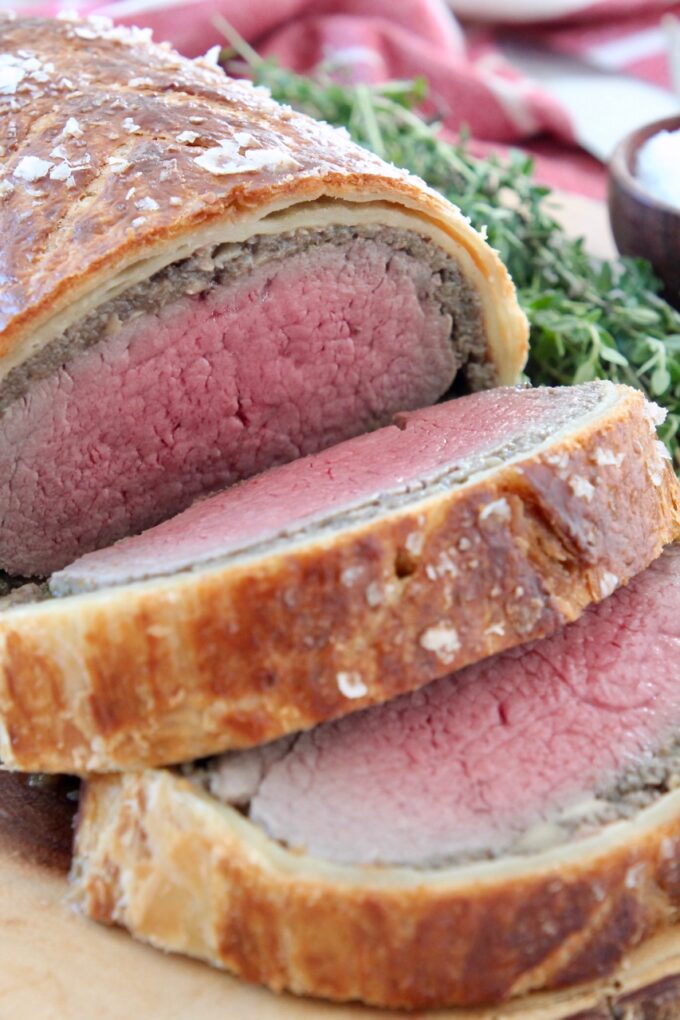
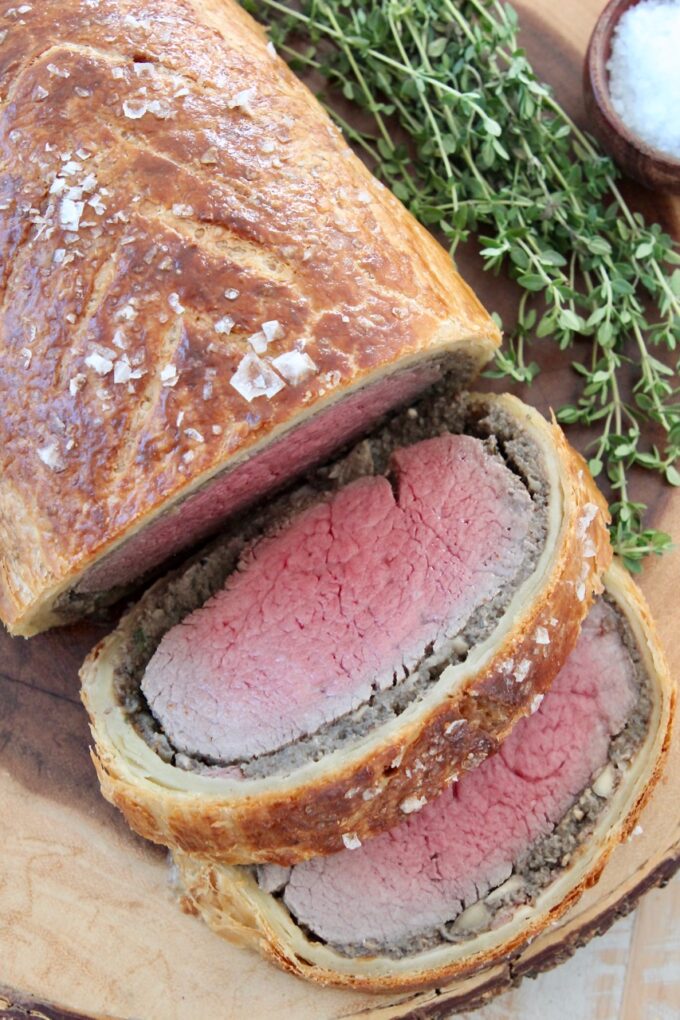
- Remove the plastic wrap and place the beef wellington seam side down on a non-stick baking sheet, or a baking sheet lined with non-stick foil or parchment paper. Brush the remaining whisked egg on top and on all sides of the beef wellington. Use a paring knife to score the top of the puff pastry. You can get as decorative as you’d like here. I made a simple pattern with diagonal lines, as you can see above. Sprinkle sea salt flakes over the beef wellington. Place in the oven and bake for 40-45 minutes, or until the pastry is golden brown and the center of the beef tenderloin registers 125°F for medium-rare. The temperature of the meat will rise 5-10 degrees as it rests. Let the meat rest for at least 10 minutes before transferring it to a cutting board to slice and serve.
Keys to success
If you’re going to devote the time and expense to make a Beef Wellington at home, I want to make sure that it’s perfect for you on the first try. How can I guarantee that? Just follow my 5 keys to success!
- Make sure there’s no excess liquid in the duxelles. I mentioned this above, but it’s a super important one. You want to make sure all of the liquid has cooked out of the duxelles, or you will end up with a soggy puff pastry crust.
- Purchase a center-cut beef tenderloin. If one end of the tenderloin is much thinner than the other end, the beef wellington will look lopsided and the thin end will become overcooked during the process.
- Make sure to thaw the puff pastry dough. Do NOT try to make this recipe with frozen puff pastry dough. It will not roll out to be thin enough to cover the beef tenderloin and it will crack as you’re trying to roll it up. A good rule of thumb is to remove the puff pastry dough from the freezer AND the packaging 30 minutes before you start working with it.
- Do NOT cut down on the chilling times. Those times are there for a reason, to make a perfectly cooked, beautifully presented beef wellington. If you try to cut down the chill times, I cannot guarantee that the beef wellington will keep it’s shape during the cooking process.
- Roll tightly! When rolling the beef tenderloin in the prosciutto and in the puff pastry dough, make sure it’s rolled tightly. If it’s not, when you slice into the wellington, there will be gaps in the layers, that could potentially alter not only the presentation, but the textures of each layer in the end.
Frequently asked questions
- How do you reheat beef wellington? After making this recipe several times, for only two people, we got really good at reheating the leftovers. The key is heating up the beef, without overcooking it, while not letting the puff pastry get soggy. For this reason, I never recommend reheating beef wellington in the microwave. If you’re in a hurry, you can pan sear slices of beef wellington over medium-high heat for 2-3 minutes per side. But the best way to reheat it is in the oven following these 3 simple steps.
- Preheat the oven to 300°F.
- Place slices of beef wellington on a wire rack on top of a baking sheet. Cover loosely with foil.
- Place in the oven for 15-20 minutes. Remove the foil and continue cooking for another 5 minutes.
- Can you make the duxelles ahead of time? Yes, the duxelles mixture can be made up to two days in advance, and I actually recommend this, if you have the time. It will make the beef wellington come together so much quicker, having the duxelles already made and chilled in the refrigerator. After making this recipe the first couple of times, I started doing this and it made the process go so much quicker!
- Can you make the beef wellington ahead of time? Yes, you can make the beef wellington up to 6 hours ahead of time and let it chill in the refrigerator until ready to bake in the oven. If you want to make it up to 24 hours in advance, you can do this, just do not wrap it in the puff pastry yet. An hour before you want to bake the beef wellington, remove the puff pastry from the freezer and from the packaging. After 25-30 minutes, remove the prepared beef tenderloin from the refrigerator and wrap it in the puff pastry. Place back into the refrigerator for 30 minutes to chill before baking.
- How many people does this recipe serve? Cut into approximately 1 inch slices, this recipe will serve 8 people. For slightly larger slices, that are closer to 1 1/2 inches thick, this recipe will serve 6 people.
- What wine do you pair with beef wellington? You’ll want a dry, medium-bodied red wine to pair with the rich, umami flavors in the wellington. I recommend a bordeaux, pinot noir or syrah.
What to serve with it
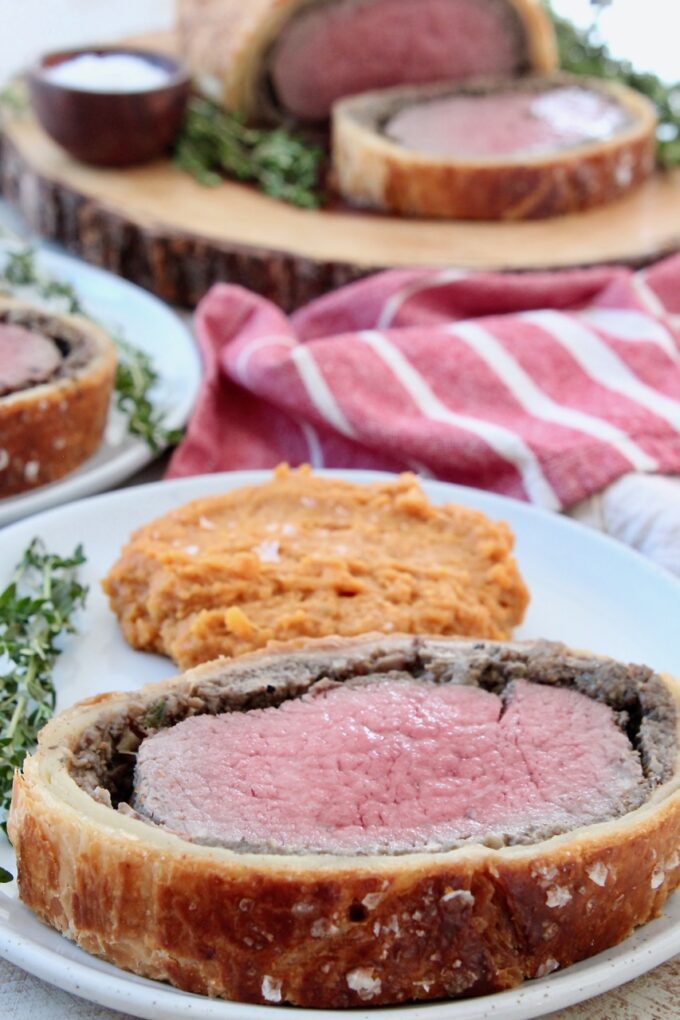
Beef Wellington is most commonly served with creamy mashed potatoes and a vegetable side dish. I’ve served it with each of these side dishes, all to rave reviews!
- Mashed Sweet Potatoes (pictured above)
- Instant Pot Mashed Potatoes
- Rosemary Blue Cheese Mashed Potatoes
- Green Beans with Bacon
- Bacon Maple Brussels Sprouts
- Roasted Garlic Broccolini
More beef recipes
If you’re on the hunt for more impressive beef recipes, I’ve got plenty, including Meatball Wellington, a fun and easy spin on this classic dish! Also, be sure to visit CalBeef.org for even more beef recipes, nutritional information and resources.
- Marinated Sirloin Steak
- Smoked Prime Rib
- Grilled New York Strip Steak
- Slow Cooker Beef Ragu
- Blackened Beef Tenderloin
- Grilled Tri Tip Marinade
- Roasted Bone-In Prime Rib
Beef Wellington
Ingredients
- 2 pound center-cut beef tenderloin, trimmed
- 3 teaspoons kosher salt, divided
- 2 teaspoons ground black pepper
- 1 tablespoon olive oil
- 2 tablespoons dijon mustard
- 1 1/2 pounds baby bella mushrooms, roughly chopped
- 1 shallot, roughly chopped
- 4 garlic cloves, roughly chopped
- 2 thyme sprigs, leaves removed
- 2 tablespoons unsalted butter
- 12 thin slices prosciutto
- 1 tablespoon all-purpose flour, for dusting
- 17.3 ounce package frozen puff pastry, thawed
- 1 large egg, beaten
- 1 teaspoon sea salt flakes, for sprinkling on top
Instructions
Beef Tenderloin
- Season the beef tenderloin with 2 teaspoons kosher salt and 2 teaspoons ground black pepper on all sides.
- Coat the bottom of a cast iron, or heavy skillet, with the olive oil. Turn the heat on the stove to high.
- Once the pan is very hot, add the seasoned tenderloin to the skillet.
- Sear the tenderloin until browned on all sides, including the ends. This should take about 2 minutes per side, approximately 12 minutes total.
- Remove the tenderloin from the skillet and place on a cutting board.
- Let cool for 5-10 minutes, then use a pastry brush to brush dijon mustard on all sides of the tenderloin, including the ends.
- Place the mustard-coated tenderloin in the refrigerator to cool.
Duxelles
- While the tenderloin is cooling, prepare the duxelles.
- Add the roughly chopped mushrooms, shallots, garlic and thyme leaves to a food processor. Depending on how large your food processor is, you might have to do this in 2-3 batches.
- Pulse the vegetables and herbs in the food processor until they’re very finely chopped, but before it becomes a paste.
- Add butter to a large skillet on the stove over medium-high heat.
- Once the butter has melted, add the duxelles mixture from the food processor.
- Season with 1 teaspoon salt. This will help pull the liquid from the vegetables.
- Let the mixture simmer on the stove for at least 25-30 minutes, or until the liquid has cooked off and you’re left with a paste.
- The mixture should be stirred only occasionally during the 25-30 minutes.
- Once the duxelles has turned into a paste, remove it from the stove and transfer it from the skillet into a bowl.
- Place the bowl of duxelles in the refrigerator to cool for at least 30 minutes.
Beef Wellington
- Once the duxelles mixture is chilled to room temperature, or below, it’s time for the first step in assembling the beef wellington.
- Place two pieces of plastic wrap down on a work surface, overlapping so that it’s twice the length and width of the tenderloin.
- Lay the slices of prosciutto in two rows, slightly overlapping, in the middle of the plastic wrap.
- Spread the duxelles in an even layer over the prosciutto, leaving about a 1 inch edge around the prosciutto.
- Place the tenderloin at the bottom of the duxelles topped prosciutto.
- Roll the meat up in the duxelles and prosciutto, using the plastic wrap to help you tightly wrap it up along the way.
- Tuck in the ends of prosciutto as you roll it up.
- Once the tenderloin is fully wrapped in the prosciutto, wrap the entire thing up in the plastic wrap and place in the refrigerator for 10 minutes. This will help it maintain it’s shape.
- Preheat the oven to 425°F.
- Unroll the puff pastry dough onto a floured surface.
- If working with two sheets of dough, overlap them slightly in the middle. Use a rolling pin to roll the dough into a rectangle, that’s about 4 inches wider than the beef tenderloin.
- Remove the prosciutto wrapped tenderloin from the plastic wrap and place it about 2 inches from the bottom of the puff pastry dough, right in the middle, with about 2 inches on both sides.
- Whisk an egg in a small bowl, then brush the whisked egg on the top and down the sides of the puff pastry.
- Place the remaining whisked egg in the refrigerator, as you’ll use that on top of the beef wellington, as well.
- Tightly roll the puff pastry dough over the tenderloin. Tuck the sides of the puff pastry down and use a fork to help seal the sides of the dough.
- Wrap the beef wellington up tightly with plastic wrap and place in the refrigerator for 30 minutes to chill.
- Remove the plastic wrap and place the beef wellington on a non-stick baking sheet, or a baking sheet lined with non-stick foil or parchment paper.
- Brush the remaining whisked egg on top and on all sides of the beef wellington.
- Use a paring knife to score the top of the puff pastry with two rows of diagonal lines.
- Sprinkle sea salt flakes over the beef wellington.
- Place in the oven and bake for 40-45 minutes, or until the pastry is golden brown and the center of the beef tenderloin registers 125°F for medium-rare.
- Let the meat rest for at least 10 minutes before transferring it to a cutting board to slice and serve.
Video
Notes
- To reheat beef wellington, you want to heat up the beef, without overcooking it, while not letting the puff pastry get soggy. For this reason, I never recommend reheating beef wellington in the microwave. If you’re in a hurry, you can pan sear slices of beef wellington over medium-high heat for 2-3 minutes per side. But the best way to reheat it is in the oven following these 3 simple steps.
- Preheat the oven to 300°F.
- Place slices of beef wellington on a wire rack on top of a baking sheet. Cover loosely with foil.
- Place in the oven for 15-20 minutes. Remove the foil and continue cooking for another 5 minutes.
- The duxelles mixture can be made up to two days in advance. And I actually recommend this, if you have the time. It will make the beef wellington come together so much quicker, having the duxelles already made and chilled in the refrigerator. After making this recipe the first couple of times, I started doing this and it made the process go so much quicker!
- The beef wellington can be made up to 6 hours ahead of time and chilled in the refrigerator until ready to bake in the oven. If you want to make it up to 24 hours in advance, you can do this, just do not wrap it in the puff pastry yet. An hour before you want to bake the beef wellington, remove the puff pastry from the freezer and from the packaging. After 25-30 minutes, remove the prepared beef tenderloin from the refrigerator and wrap it in the puff pastry. Place back into the refrigerator for 30 minutes to chill before baking.
- This recipe will serve 8 people, when it’s cut into approximately 1 inch slices. For slightly larger slices, that are closer to 1 1/2 inches thick, this recipe will serve 6 people.
- I recommend pairing the beef wellington with a dry, medium-bodied red wine to pair with the rich, umami flavors in the wellington. I recommend a bordeaux, pinot noir, chianti or syrah.
Nutrition Facts
We are a participant in the Amazon Services LLC Associates Program, an affiliate advertising program designed to provide a means for sites to earn advertising fees by advertising and linking to amazon.com.







3 Comments on “Beef Wellington”
Tried this but another site recipe. I really wish I would’ve found yours first! So we’ll put together, simple instructions, GREAT pictures to go with it. I’m saving your page for next time!!!!
Ps. If you haven’t tried it, you should!
Thank you for having the best written out instructions!
Thank you so much Donna! I really appreciate that. Can’t wait for you to try my recipe next time 🙂
Great meat dish for a nice dinner.